DIY Enthusiast Hacks His Way Into Building His Own Musical Instrument (And It Rocks!)
TL;DR
I built a sci-fi bass from scratch, packed with a synth, a wireless transmitter, a hacked built-in tuner and voltmeters. This monster runs on lithium batteries, charging like your smartphone. Is it perfect? Heck no. But sounds cool. There you go!
PREFACE
This is a story of mistakes and domestic luthiery. Imagine a random a block of wood, add a Japanese hacksaw, a chisel, a drill, a soldering iron, a 3D printer, a generous dose of unconsciousness, and a mountain of glorious mistakes. The result? CYBERBASS, an electric bass guitar that looks like something out of a science fiction movie and sounds like a dream, or a nightmare, depending on whether the wires were connected properly.
Launching myself into the delicate craftsmanship’s world without a shred of experience was like trying to reach orbit with an umbrella: technically possible, but only if we ignore physics and common sense.
In December ’24 I decided to spend some time away from the keyboard, so I tried my hand at one of my usual experiments. How did it go? Well, I would say both epic and tragicomic. Every mistake was a step forward and every background noise that came out is now just sound character. Between flashes of lucidity, unexpected electric shocks and moments of frustration when all seemed lost, I discovered that true art is knowing how to improvise. In this story poised between do-it-yourself and creative madness a modest touch of poplar rebels against its fate to take flight into the acoustic stratosphere with synth vibes worthy of an interstellar spaceship.
PHILOSOPHY
“Hackers are lazy individuals always seeking for shortcuts and automation to achieve their goals with minimal effort. They value the smart work over the hard work, leveraging technology they master and creativity they own to maximize output while minimizing the effort.”
Embracing the KISS principle (Keep It Simple, Stupid) was essential for building a futuristic electric bass from scratch. The key was to simplify everything from the ground up, focusing on the core objectives without unnecessary complexity. I minimized tools, relying on affordable, easily accessible equipment from the local hardware store instead of relying on specialized and expensive equipment. Did this approach make the process easier? Not exactly, but it allowed me to make meaningful progress.
GOAL
The inspiration behind this project revolved around a precise and concise motto.
“No wires, no stress!”
The idea was to revolutionize the traditional electric bass guitar by eliminating the hassle of cables and introducing more advanced functionality.
At its core, the concept aimed to achieve four key features:
- Wireless Connectivity: A bass guitar capable of transmitting its signal wirelessly to an amplifier, offering unparalleled freedom of movement during performances, without using external third-party accessories.
- Integrated Synth Capabilities: Instead of relying on external foot pedals for effects, the design incorporated the electronics of a carefully chosen synth pedal (no bran names will be displayed). By embedding its circuit directly into the body of the bass, the instrument provides immediate access to rich, futuristic tones without the need for additional equipment. This innovation eliminates clutter on stage and ensures seamless control over the synth effect directly from the bass (without breaking your back adjusting the knobs every time).
- Integrated Chromatic Tuner: this is a valuable feature often found in acoustic instruments actively amplified by a 9 Volts battery and a piezo pickup. I’ve always loved it but I could not find it on non-acoustic electric basses. Having a built-in tuner enhances convenience, especially during live performances (or practice sessions) and allows to make quick adjustments on the fly. Hands down, an essential feature for any serious musician.
- WOW-Effect: A visually striking, futuristic design that commands attention, making the instrument not just functional but a centerpiece of any performance.
This vision wasn’t just about building an instrument, it was about re-imagining the electric bass for a modern era. The CYBERBASS combines vintage craftsmanship with fresher technology, creating something new that’s as visually bold as it is sonically innovative.
MATERIALS
Building a musical instrument from scratch, at home, seems like an insurmountable challenge, but with a low budget, some spare time and a pinch of inventive you can make a professional blush.
What I choose:
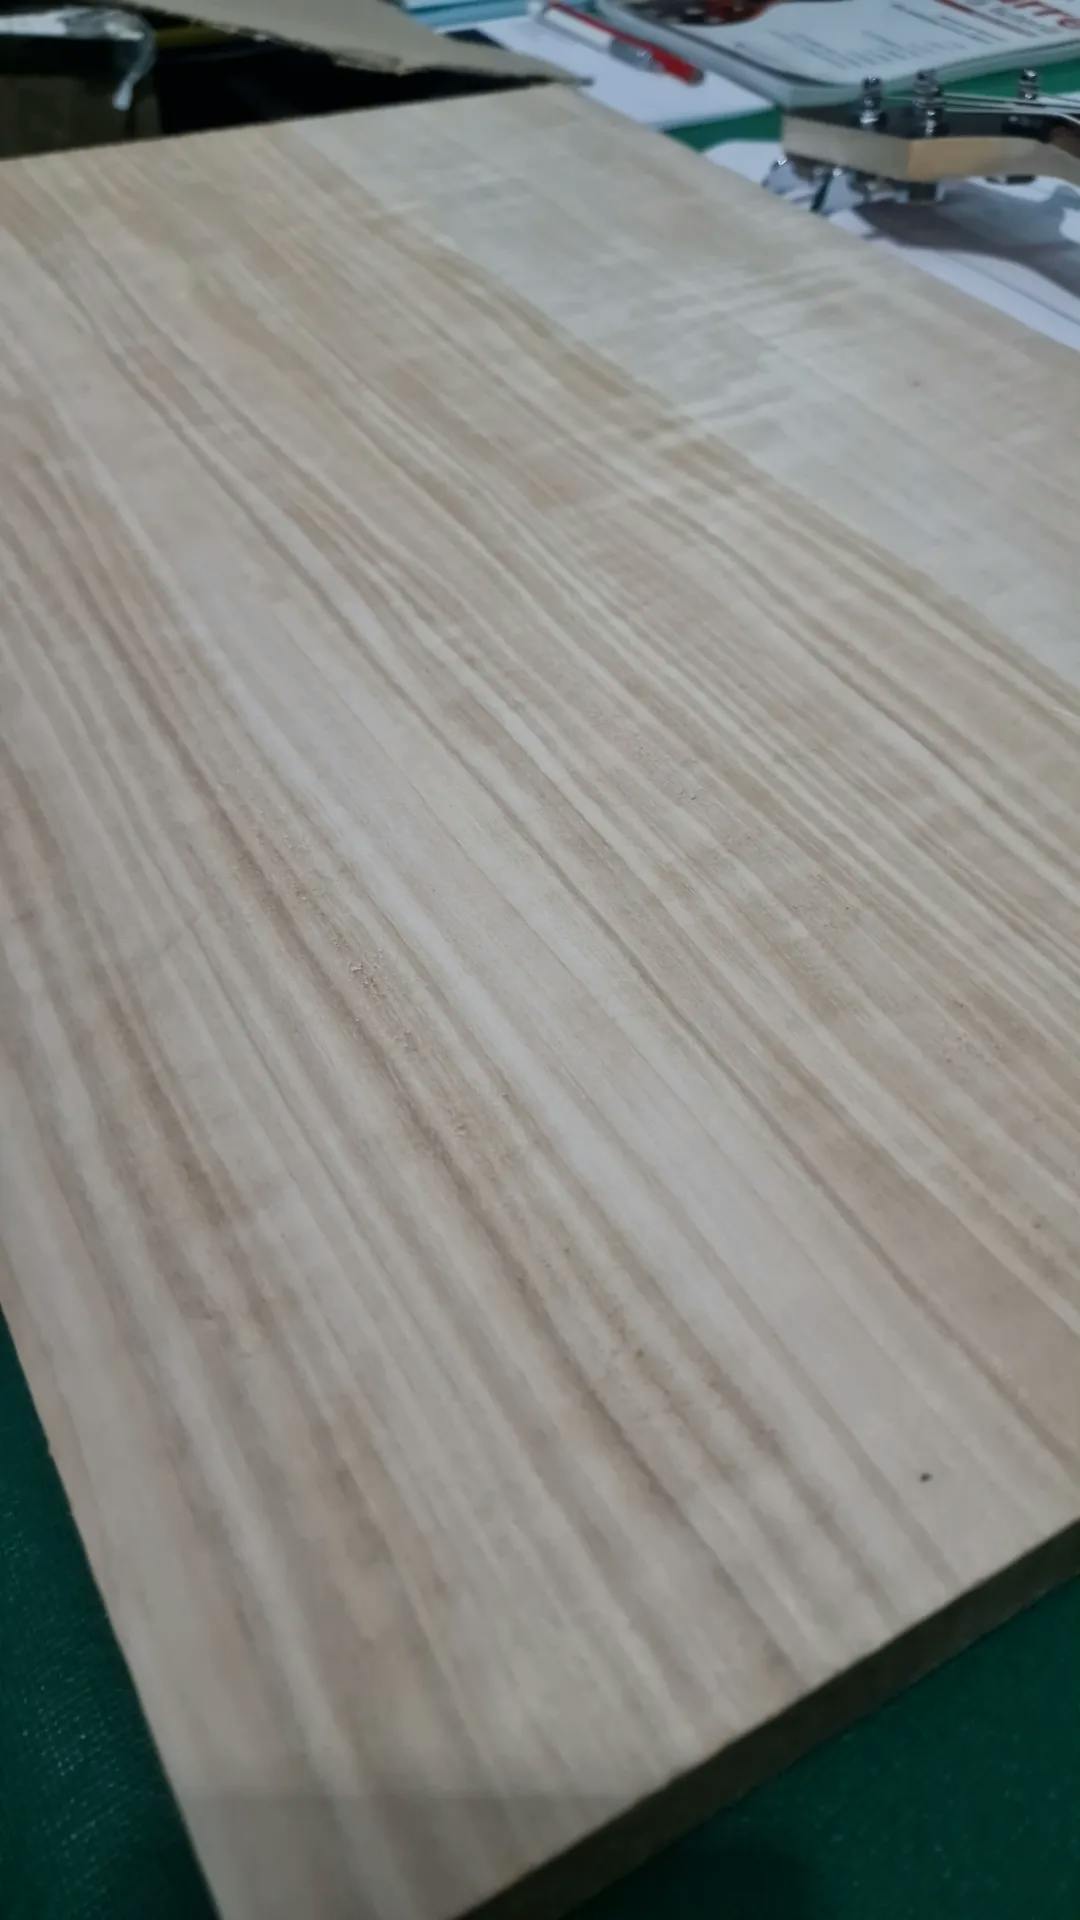
- A block of aged (~10yrs) poplar wood: chosen mostly for its affordability and workability. Not a premium wood hands down, but perfect for experimental projects. You can find it on local lumber yards, online marketplaces, or even reclaimed from old furniture if you’re feeling resourceful.
- A bass fret-board: you have some choices here in place. If you have some old bass that can act as organ donor, you can pick the fret-board from it. On the other hand, you can find both used/new options on a budget online.
As far as I understood from many resources, it’s best to avoid building your own, especially as beginner. Crafting a fret-board requires specialized and expensive tools, advanced woodworking skills and can be time-consuming rather than frustrating. Additionally, inexperience increases the risk of costly mistakes. Just buy on so you can focus on enjoying the rest of the journey.
- 1 x Bass pickup: there’s a world behind this topic. This project started with 2 separate pickups but ended with 1 only. Personally I’ve always preferred the double-coil ones. They provide a rich and full sound so I opted for an affordable option in this category.
- 1 x Bass bridge: this is a critical component that influences both the instrument’s tone and playability. It serves as the anchor point for the strings, transferring their vibrations to the body of the bass. A well-designed bridge can enhance sustain and resonance, contributing to a richer sound. When selecting a bass bridge, consider factors such as material, height adjustment options, and overall design, as these can significantly impact the bass’s performance and tonal characteristics.
- 1 x Set of strings: I prefer thick black nylon strings for their warmth and deep bass dominance. They provide a smooth feel, making them suitable for both beginners and experienced players. Their thickness enhances sound fullness and sustain, improving the instrument’s tonal quality. Additionally, they are gentle on the fingers, reducing fatigue during long sessions, ensuring a comfortable and enjoyable musical experience.
- 1 x TX wireless module: is essential for transmitting the bass signal to an amplifier, eliminating the hassle of cables. I tried a cheap model and it worked just fine out of the box. You don’t need to spend a lot to get a decent setup. Affordable options can deliver solid quality/performance ratio. I cannibalized the enclosure in order to get into the electronics that I could embed in the remaining circuitry.
- 1 x Synth pedal effect: the choice here is up to you. Your style, your effect. In my case I went for a mono-synth. This could create rich, synthesized sounds with a range of tones and effects to be mixed in order to expand the sound palette. This becomes crucial when looking for something that can help in exploring new sonic territories.
- 1 x Pocket-sized chromatic tuner: necessary for on-the-go tuning with a clear display. I did go for a small one with back-lit LCD.
- 2 x Mini LCD Voltmeters: these small gadget are crucial for monitoring the battery voltage, providing real-time readings. This feature helps prevent unexpected power loss and ensures that your setup operate smoothly.
- 3 x 250KOhm Potentiometers: basic electronics to control pickups volume, tone and mix both.
- 3 x Push-button switch: to easily toggle on and off respectively the TX wireless module, the tuner and the synth effect.
- 4 x 3-Position switches (On-Off-On): fundamental for managing the overall setup. They allow you to easily shut down power, divert the signal to a pedal, tuner, or wireless TX module.
- 1 x Led: for monitoring the pedal activity being a clear visual indicator also in bright conditions.
- 2 x 18650 3.7V Li-Ion rechargeable batteries: serve as the primary power supply of the electronics, providing reliable and long-lasting energy delivery.
- 2 x 18650 Battery holders: simple one-cell enclosure that comes with with +Ve (red) and -Ve (black) solderable fly leads to allow easy connection. There also is a single screw hole at the base of the holder for permanently mounting.
- 2 x TP4056 Charging modules: affordable component designed for safely charging lithium-ion and lithium-polymer batteries. It uses a constant current/constant voltage (CC/CV) charging method to prevent overcharging. It features LED indicators for charging status and includes protections against overcharging, over-discharging, and short circuits. Its compact size makes it ideal for various DIY electronics and portable devices. A must-have in your electronics toolbox.
- 2 x DC-DC (buck) Step-Up and Step-Down voltage converters: versatile modules that adjust a source battery’s voltage to desired levels. One module steps-down 3.7V to 3V, providing the necessary power for the tuner while the other steps-up 3.7V to 9V, suitable for powering a synth effect pedal. This capability allows for efficient voltage regulation in various electronic applications, ensuring devices receive the appropriate voltage for optimal performance.
- 1 x USB-C female socket: used for charging the embedded batteries, offering fast and efficient charging capabilities. The USB-C standard ensures compatibility with various chargers and devices, making it a practical choice for modern setups.
- Aluminum foil tape: effective solution for noise reduction while masking pickups and electronics in general. It acts as barrier and is pretty good at sealing gaps.
- PLA+ for 3D printing: a versatile material I used for 3D printing the front, lateral, and back plates. It provides durability and a smooth finish, making it suitable for both aesthetics and functionality in your design. I did experiment with different colors.
- A bunch of wood screws: widely used for securely fastening all components together, ensuring that everything stays firmly in place. My two cents? Go for quality ones. You won’t regret it.
- Spray paint: up to you, but keep in mind that this is a critical choice for adding color to the instrument since some paints suppress the resonance capabilities of the tone wood. I suggest to use paints that do not compromise the sound quality. A lightweight acoustically-friendly finish can preserve both the instrument and its tonal integrity making it an essential consideration in the finishing process.
The goal for this project was clear from the start: use as few tools as possibleto prove that crafting a custom bass doesn’t require an industrial-grade workshop — just the right tools, some patience, and a willingness to problem-solve. Every cut, hole, and soldered joint was made with a minimal yet effective toolkit, allowing me to work efficiently without over-complicating the process.
I relied on a handful of essential tools, each playing a critical role:
- A ruler and a pencil for careful measurements and marking before the cutting phase, because even the most intuitive builds need a solid plan.
- A Japanese hacksaw, chosen for its ultra-fine teeth and clean cutting ability, made precise handmade cuts in the poplar wood without tearing fibers or causing excessive splintering.
- A set of chisels, razor-sharp and reliable, became my sculpting instruments for fine adjustments. The trick? Keeping them sharp. Dull chisels don’t cut wood, they chew through it.
- A cordless drill, the workhorse of the build, handled everything from basic drilling to milling cavities for electronics and screws. With the right bits, it became the Swiss army knife of this project.
- A precision gauge ensured that measurements — especially for neck fitting and string action — were spot-on. Precision doesn’t just make the build neater; it directly affects the instrument’s playability and tone.
- A sandpaper sponge became my go-to for smoothing rough edges and surfaces. Unlike standard sandpaper, the sponge allowed for controlled sanding, preventing over-sanding, which could have altered the dimensions of critical parts.
- A soldering iron was indispensable for wiring up the bass. Clean, strong solder joints meant solid signal transmission with minimal noise. I learned quickly that a bad solder joint is a silent killer — it doesn’t break immediately, but when it does, it’s always at the worst possible time.
- A multimeter played the role of detective, helping troubleshoot electrical connections, check for continuity, and ensure no accidental short circuits. Skipping this step would have meant gambling with the electronics, which is never a good idea.
- A 3D printer, the most modern tool in the lineup, allowed for custom-made plates, covers, and components. Without it, achieving the same level of precision and aesthetic consistency would have been significantly harder. This was a game-changer that blended digital fabrication with old-school woodworking.
- Finally, a generous dose of recklessness and willingness to learn proved to be just as crucial as any physical tool. From the first cut to the final solder joint, this project was an exercise in diving headfirst into the unknown, facing failures head-on, and turning mistakes into lessons.
THEORY
At the heart of any stringed instrument lies a fundamental principle: how the string vibrates. So, understanding how it works, is essential to shaping the sound of an electric bass, in this case.
When a string is plucked and begins to vibrate, the interference created by the vibration in the magnetic field of the pickup causes changes in the flow of energy passing through the winding. The energy thus passes from the guitar to the amplifier, from there to the speakers and finally to our ear becoming sound.
Strings vibrate as a sine wave moving in virtually infinite patterns called partials or harmonics.
The resulting sound depends on the placement of the pickups along the string’s vibration pattern (tuning fork).
The points where the strings do not move are called nodes and the points where the string vibrates at its maximum amplitude are called antinodes.
Pickup placement along the tuning fork is by far one of the most influential factors in the sound of bass and electric guitar.
The closer we move a pickup to the center of the vibration of the open-ended string i.e., the 12th fret, the warmer, richer and more bass-rich the sound will be. The closer we bring a pickup to the bridge, the brighter the sound will be.
WOODWORKING
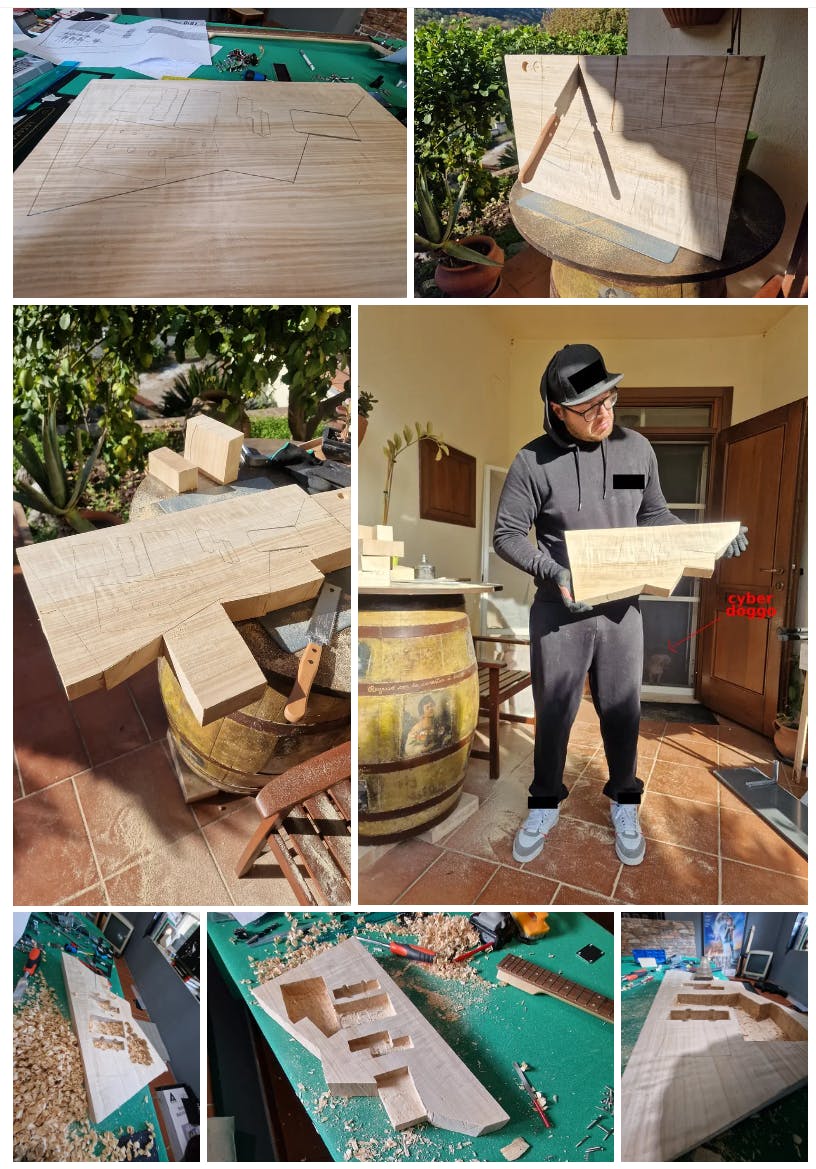
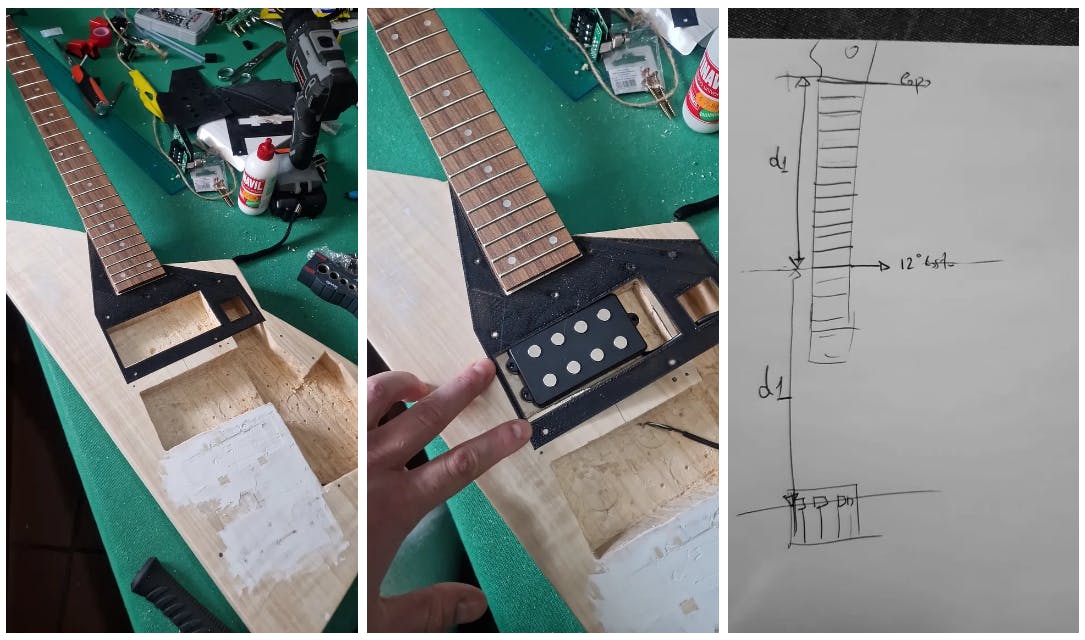
I started with a 38 x 57 x 5 cm block of poplar. The thickness (usually electric basses are between 4/4.5 cm) was chosen slightly larger to have a margin for error and to make the final result more massive.
I began by sketching the outline of the electric bass on the wooden touch by taking appropriate measurements to ensure a good compromise between size:weight ratio and space for essential components as well as extra electronics.
TIPS: Draw, visualize proportions and anticipate problems. Measure twice, cut once. Mistakes at this stage could be pretty hard to fix.
Once I was satisfied with the design, I began to shape it by dividing it into medium-sized blocks to make it easier for me to cut with the Japanese hacksaw. This tool is surprising because it allows very good precision even when cutting by hand. The difference with traditional hacksaws is that this one cuts only in one direction, pulling the hacksaw to itself. The force distribution in the pull allows the blade to stay straight instead of bending.
One of the most critical steps was deciding where to position the pickup and how to organize the cavities for the electronics.
After obtaining the rough body of the bass, with the cordless drill and a 2.5-cm Forstner bit I roughly milled the slots for housing the various components (on the front and on the back) and for the neck attachment. Next, with the chisel, following the blueprint traces I finished all the slots flush.With the abrasive sponge I then gave a first light sanding so as to remove the machining residue.
TIP: Always work with the grain of the wood to avoid splintering. Take your time and do it slowly. Every stroke counts.
MEASUREMENTS
Once I had finished with the rough body, I photographed it from above and reported on the printout all the measurements taken with a ruler and precision caliper. This maneuver was essential for precise CAD design of the various plates to be made in 3D.
TIP: Once the 3D models were designed, it was helpful to print them to a very thin thickness of ~1 mm, place them on the body, and finish the measurements in an efficient trial-and-error process.
Next, I proceeded with the arrangement of the holes on the back for screwing the handle to the body. For this step, I used the neck plate as a guide for the holes drilled with the drill.
TIP: Always measure the diameter of the screws with a caliper and choose the most suitable screw for the drill accordingly. I usually choose drill bits with a slightly smaller diameter so that I have a better grip.
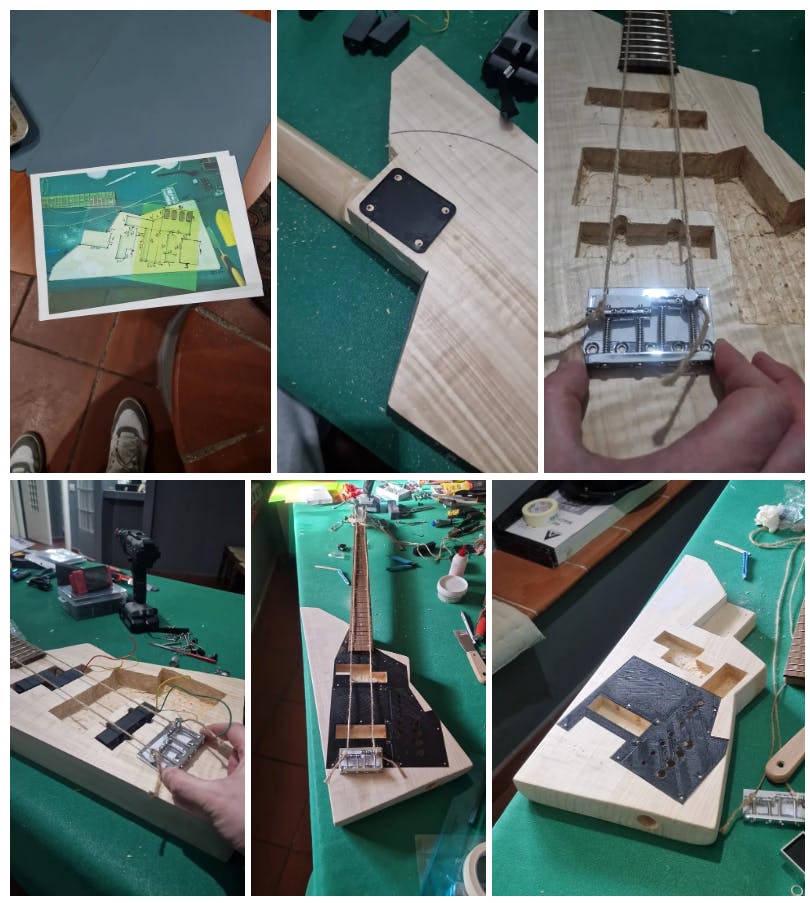
After provisionally screwing the neck to the body, I proceeded from one end to tie 2 strands of string (with a thickness similar to that of a bass guitar string) to the tuning pegs of the first (E) and last (G) strings, and from the other end to the first and last bridge mechanics. I manually tensioned the strings and moved millimetrically on the vertical and horizontal axes until I got a good alignment. I took the hole marks with pencil and proceeded to make small holes with the drill to facilitate the entry of the screws.
MISTAKES (CHAPTER I)
The initial idea for making this bass was to use 1 pickup at the neck and 1 pickup at the bridge. Between the two I planned to insert the cutout to house the synth pedal (so that the controls would be in the useful area), inevitably diluting the spaces.
TAKEAWAY: This (bad) decision inexorably caused the position of the bridge to shift downward by several centimeters. This resulted in a misalignment in the scale length — the critical distance between the nut and the bridge, which must be exactly double the distance between the nut and the 12th fret. The incorrect placement not only affected the instrument’s intonation but also made it impossible to properly tune and play.
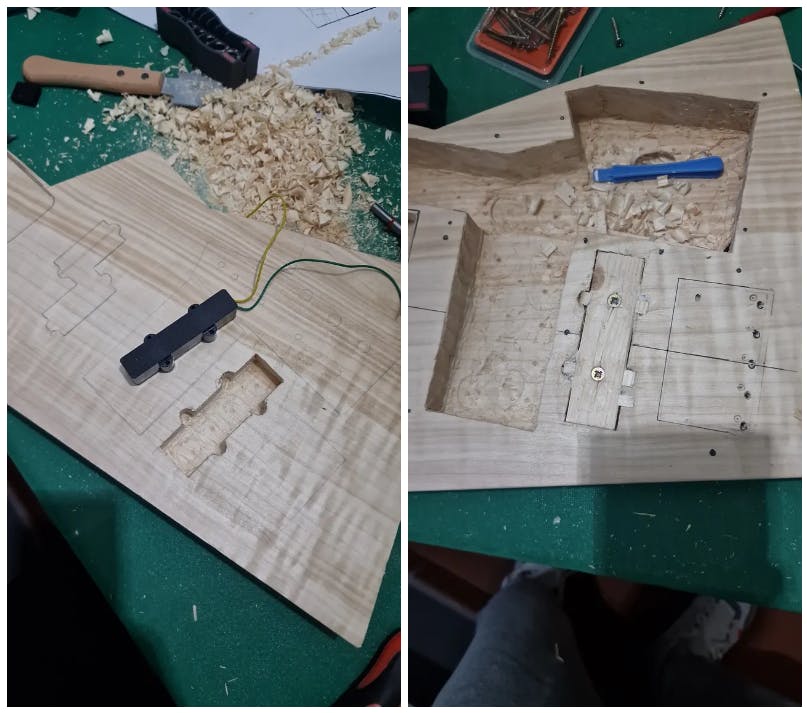
By carefully shaping the scraps of wood from the primordial block work, carefully trimmed and grafted, I proceeded to fill the gap in the recess that would house the bridge pickup, so that I would have a surface that would allow me to proceed to repair the damage.
I took some leftover wood scraps and carefully shaped and trimmed them to fit the gap where the bridge pickup would go. The goal was to create a solid surface that would allow me to proceed with the repair. It took some patience, but once the pieces fit perfectly, I glued and screwed them in place and let everything dry.
After the glue had cured, I sanded the area so that it would harmonize with the rest of the wood. This gave me a stable base to reposition the bridge and realign everything correctly, both the length of the scale and the placement of the pickups.
ADJUSTMENTS (CHAPTER I)
To fix this issue, by pivoting from a 2 x Single-coil pickup configuration to a 1 x Double-coil pickup, first of all I proceeded to enlarge the pickup housing on the neck so that the new pickup would fit cleanly.
Later, I started carefully measuring the correct diapason (the distance from the nut to the bridge, which must be exactly double the distance between the nut and the 12th fret), then marked the precise position where the bridge should have been placed.
Before repositioning the bridge, I needed to address the cosmetic damage caused by the original misplacement. The previous holes and uneven surface where the bridge had been mounted had to be corrected. To do this, I filled the gaps with wood filler, ensuring a smooth and level finish. Once the filler dried, I sanded the area carefully, blending it seamlessly into the surrounding wood. Although this step didn’t affect the bass’s functionality, it was crucial for maintaining a clean, polished appearance.
With the surface repaired, I moved on to the more critical task: correctly mounting the bridge. Using a chisel and sandpaper, I prepared the new mounting area and drilled fresh holes at the proper location. Securing the bridge in its new position restored the correct scale length, ensuring accurate intonation and tuning across the fretboard. This adjustment was key to making the CYBERBASS playable at all, with clear notes and proper pitch at every fret.
LESSON LEARNED: Sometimes, precision matters. Always triple-check your measurements, especially for critical components like the bridge, as even a small misalignment can have a big impact on the final result!
PAINTING
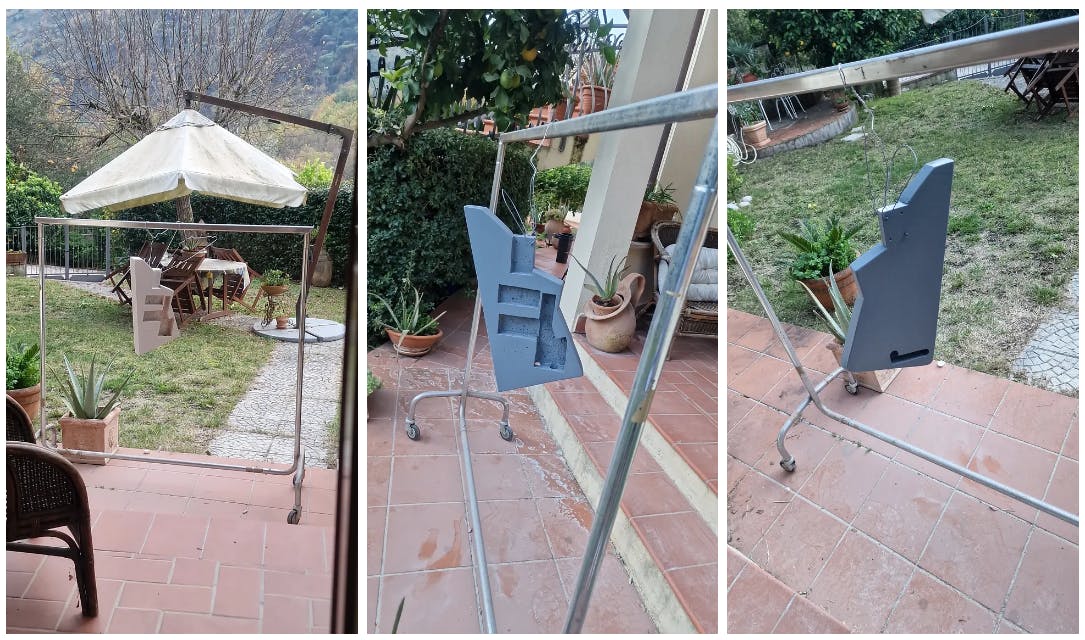
When it comes to painting a custom instrument, there are several techniques to choose from, each with its own pros and cons. As this was my first build, I had to pick a method that balanced ease with quality. Swabbing and brushing were appealing but felt better suited for more traditional finishes, while spray painting offered a smoother, more modern result. Though spray painting required some learning and practice, it seemed like the best fit for achieving the sleek, professional finish I wanted. It allowed me to push my skills while still getting the result I envisioned.
The next step was to choose the right type of finish. There is a heated debate about the use of nitro lacquer versus other finishing solutions. Nitro lacquer is highly regarded for its ability to create a thin, transparent coating that allows the wood to “breathe,” preserving its natural resonance and enhancing tonal qualities. However, it comes with some drawbacks: nitro is more brittle, prone to chipping, and typically requires more upkeep over time.
Modern finishes, such as polyurethane or acrylic paints, offer a different set of advantages. These finishes are far more durable, resistant to impact and wear, and easier to maintain. However, their thicker application can potentially alter the wood’s resonant properties, leading to a subtle difference in tonal characteristics.
I opted for a combo of a wood primer + acrylic paint with a semi-gloss transparent shield finish. This choice provided a balance of aesthetics and practicality. The primer ensured a smooth and even base for the paint, while the acrylic finish offered excellent durability without being overly thick. The semi-gloss transparent shield added a protective layer to preserve the instrument’s futuristic look while maintaining a clean, refined aesthetic.
This finishing approach not only ensures the longevity of the instrument but also highlights its design without compromising its sound quality. The result is a finish that’s as bold and modern as the instrument itself, striking the perfect balance between form and function.
TAKEAWAY: Your choice of finish should depend on how you plan to use the instrument, the tonal qualities you want to preserve, and the look you’re aiming for. In my case, the combo resulted in a decent outcome.
MASKING
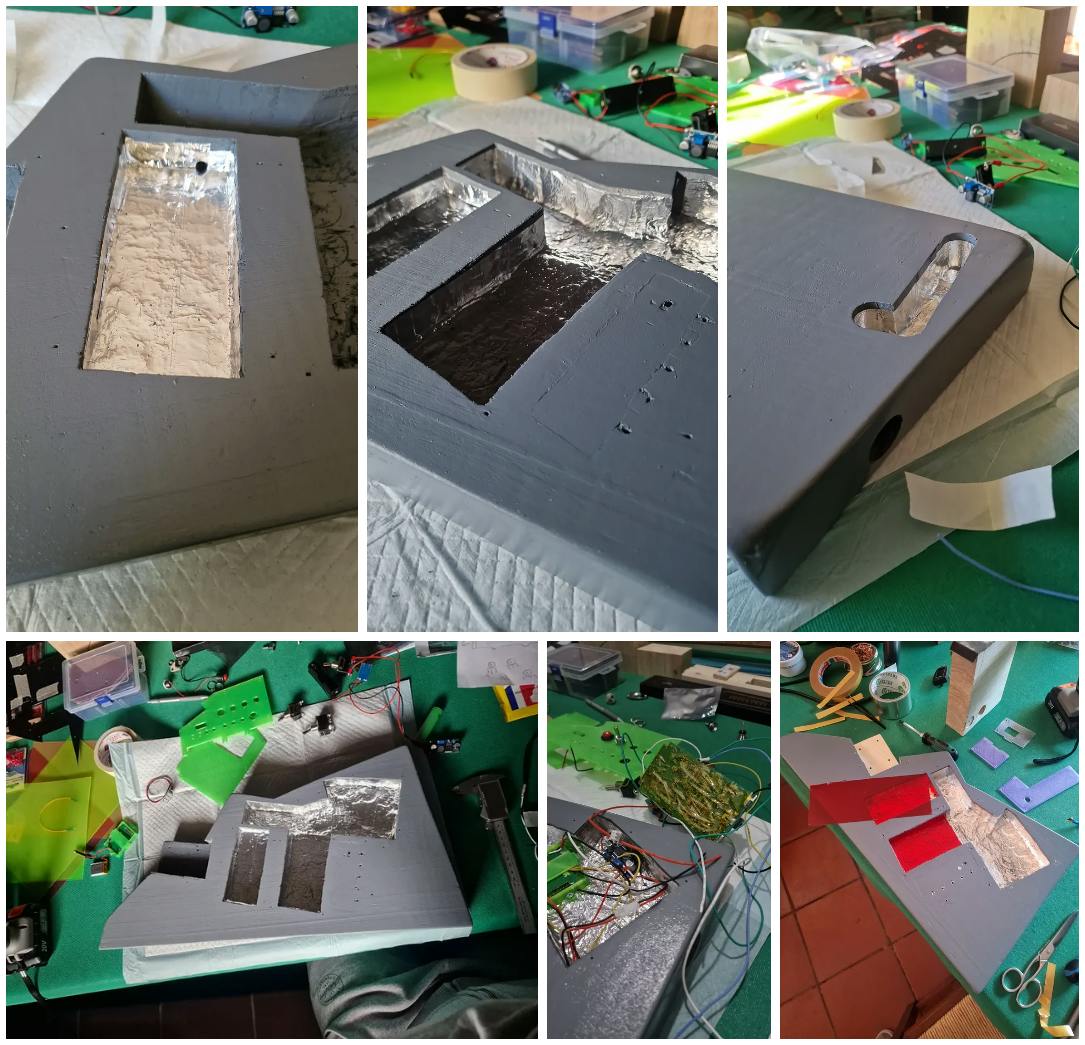
To ensure both functionality and safety I took extra precautions when preparing the cavities before the assembly. Shielding the pickup and the electronic components is a critical step in ensuring sound quality and reducing unwanted noise or interference.
The aluminum tape provided an effective shield against electromagnetic interference (EMI), which can cause humming or buzzing, especially when operating in environments with multiple electronic devices.
Kapton tape, known for its heat resistance and electrical insulation, was used to prevent short circuits by insulating sensitive areas where wires or connections could potentially touch the aluminum shielding.
Thin PVC sheets added an extra layer of protection, creating a physical barrier between components and further minimizing the risk of damage or noise issues.
I took care to shield all electronic cavities except the one designed for the wireless transmitter. Unlike other components that benefit from shielding to reduce noise and interference, the transmitter requires an open, un-shielded space to maintain strong and uninterrupted signal transmission. Shielding this cavity could lead to signal degradation or disruptions, so I deliberately left it exposed to ensure optimal wireless performance. This approach prevents interference caused by conductive shielding materials, allowing the wireless functionality to remain reliable and efficient while balancing the needs of the instrument’s overall sound quality.
TAKEAWAY: In essence, while most electronic components required shielding for noise reduction and grounding, the wireless module needed an open space to work optimally.
MISTAKES (CHAPTER II)
This project was as much about learning as it was about creating. For a first-time builder, mistakes are inevitable, each one a stumbling block that tests your patience and problem-solving skills. Some errors were minor nuisances, while others challenged the very functionality of the instrument. Yet, every misstep became a stepping stone, teaching me invaluable lessons about precision, planning, and craftsmanship.
Here, I’ll share the most significant mistakes I made. Whether you’re an experienced luthier or a fellow first-timer, I hope they’ll help you avoid similar pitfalls in your own projects.
- Awkward Tuner Placement: In my excitement to integrate a built-in tuner, I placed it on the front plate of the bass. While it seemed like a convenient and visible location at first, this decision quickly backfired. The tuner’s position made it unreadable mid-performance, forcing me to stop and tilt the bass every time I needed to tune, disrupting the natural flow of playing.
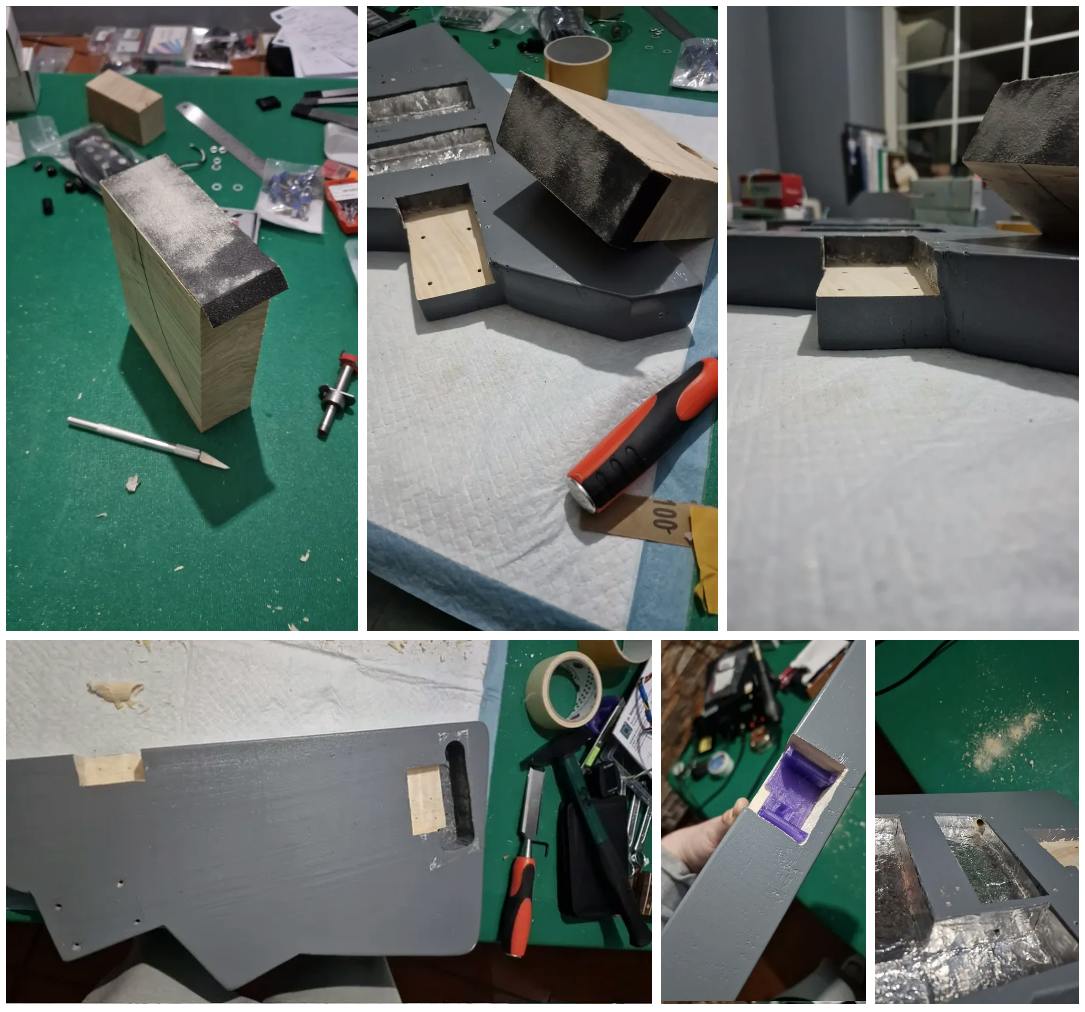
- Painting the Neck Socket: A rookie mistake I hadn’t anticipated was painting the neck pocket. The recessed area where the neck joins the body. Although the layer of paint seemed inconsequential, it compromised the snug fit required for optimal sound transfer. This oversight affected the instrument’s tonal quality, as the connection between the neck and body is essential for resonance and sustain.
- Incorrect Neck Pocket Slope: The biggest challenge came from miscalculating the slope of the neck pocket. I accidentally made the socket too concave, which threw off the neck angle. This resulted in strings sitting far too high above the fret-board (known as excessive string action), rendering the bass nearly unplayable and impossible to tune properly at the bridge.
ADJUSTMENTS (CHAPTER II)
Dealing with mistakes requires creativity, patience, and a willingness to go back to basics. Turning them into solutions with the right attitude makes things smoother. It was not just a matter of fixing errors, but refining the instrument to meet its full potential, with affordable tools and simple tricks.
To resolve the tuner issue, I explored alternative placements, eventually deciding to move it to a more ergonomic location on the side of the body, near the neck joint. This made it discreet yet easy to access without interrupting play.
TAKEAWAY: Always prioritize functionality and ergonomics when placing components. Think about how they’ll be used in real-life scenarios.
To fix the painted neck pocket, I carefully sanded off the paint using fine-grit sandpaper taped to a big and heavy wood chunk until I restored a clean, bare wood surface. Once the neck pocket was free of paint, the neck fit snugly, securely and with the right angle, which greatly improved the instrument’s resonance and tonal quality.
TAKEAWAY: Never paint the neck pocket. A tight wood-to-wood connection is critical for sound transfer and overall instrument performance.
Fixing the incorrect slope of the neck pocket required meticulous work. I measured the ideal angle and marked the adjustments needed. Using sandpaper and a small chisel, I gradually reshaped the pocket, frequently dry-fitting the neck to ensure alignment. After several iterations, I achieved the correct slope, which brought the string action to a playable height and restored tuning stability.
TAKEAWAY: The neck pocket angle is critical to an instrument’s playability. Always double-check your measurements and take your time during this step. Even a slight miscalculation can have a major impact.
DESIGN
One of the most satisfying parts of building the CYBERBASS was bringing its design to life approaching simple and sharp edges.
Simplicity empowers precision. Using an online 3D CAD software I could easily create plates, covers, masks, and custom labels to integrate seamlessly with the whole instrument. The process involved not only digital modeling but also iterative testing to refine the fit and alignment.
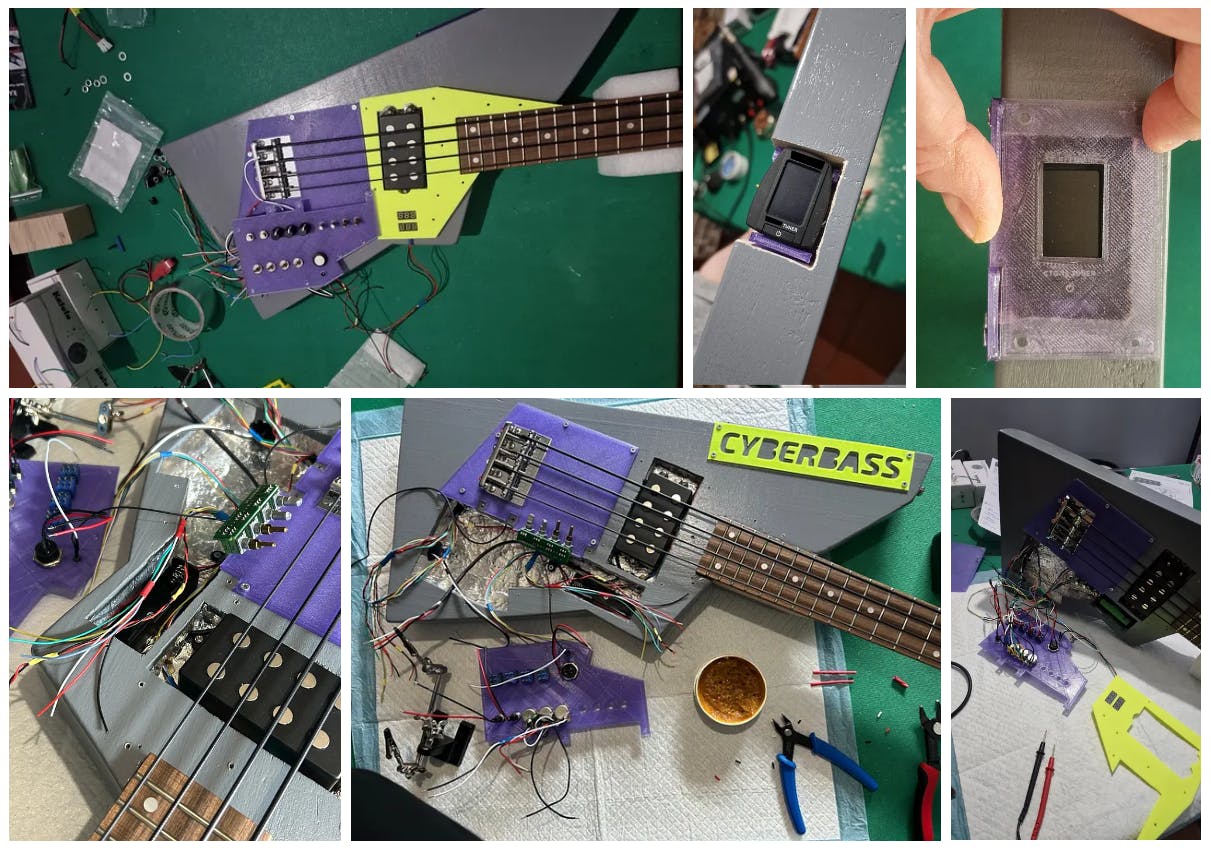
The front plates serve both functional and aesthetic purposes. It has been split in 3 sub-shapes. One accommodates the bottom part of the fretboard, the pickup and the two voltmeters. The simpler one acts as bridge contour. The more elaborated one (with a plenty of holes) has been designed to host the 4 knobs from the synth pedal, the 3 knobs for the pickup, 3 buttons and 4 switches.I aimed to achieve easy access to controls during play.
To attach the plates and maintain structural integrity, I opted for screws to secure them to the body layers. This approach allowed for easy and robust assembly (or disassembly when adjustments were needed). Designing the plates was not just about functionality but also about creating a cohesive, polished appearance that complements the main aesthetic.
TAKEAWAY: These components were printed several times before reaching the precision needed to ensure they fit perfectly when assembled. Start with thin, rough, low-infill prints and then refine them one print at a time.
SCHEMATICS
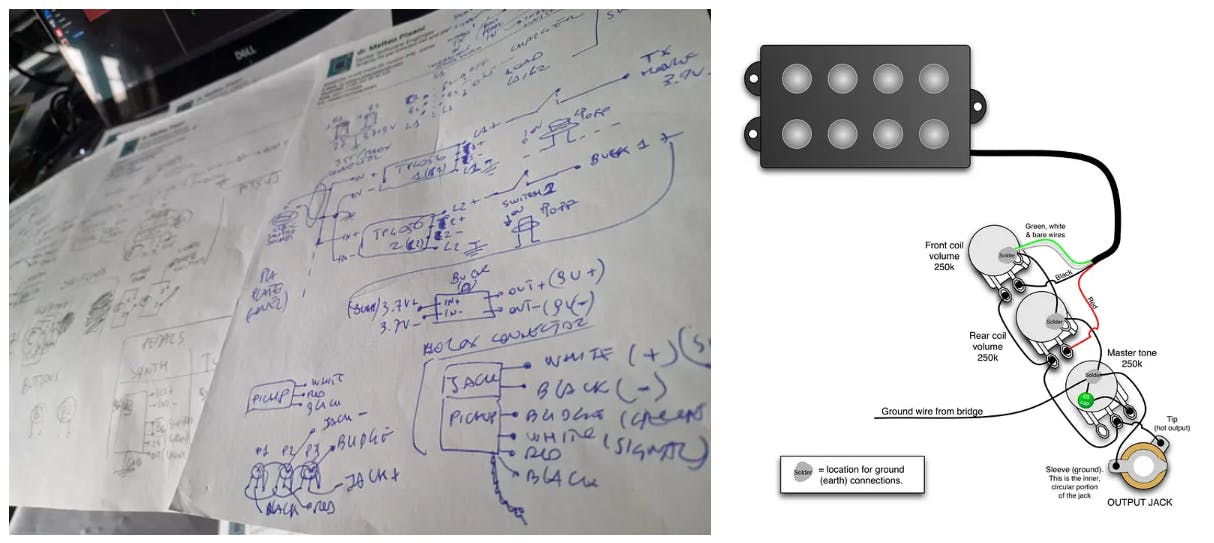
I started messing around on paper sketching the big picture of what the final wiring would be. From the rough outline, I came out with a map of 5 macro sections:
a) Power Management: One of the most critical aspects is the power distribution system which must ensure that components with different voltages can coexist and operate efficiently without interference. I could identify three different voltages 3V, 3.7V and 9V that should coexist without creating interference between them, one for the tuner, one for the wireless module and one for the effect pedal. Then, I decided to power everything with 2 x 18650 batteries, rechargeable via USB-C socket. To monitor their level, I considered including two small and simple voltmeters with backlit displays, operated by a switch, so that I could have a readout of the charge status, always at hand.
b) Analog Signal Path: Despite all the ambitions and futuristic implementations, the CYBERBASS is ultimately an instrument that can be played also “offline”. Not surprisingly, a 6.3mm jack input has been included. When all switches are OFF (no active current circulates) it can be safely used in a wired, passive mode. This choice can be considered as a sort of “backup system” in case the electronics malfunction, to save the live performance.
c) Wireless Integration: One of the most unique features is the integrated wireless transmitter. This decision required careful planning to ensure the transmitter wouldn’t affect other components, particularly the analog signal path. By unwinding the “active” signal path, the source signal coming from the tone’s potentiometer goes into the synth pedal input then, its output goes into the 2nd switch. Here, depending on the position, the signal can be diverted into the tuner or can be directly injected in the wireless module that streams it to the receiver (connected to the amp).
d) Control Panel Layout: Since there are quite a few controls involved here to manage, the front panel has been developed with a precise purpose, namely, enhance (and do not discourage) usability while maintaining an ergonomic layout. The arrangement of knobs, buttons, switches, led indicators, and voltmeters has been iterated several times until an acceptable compromise between minimal design and utility has been reached.
e) Grounding: To minimize the risk of “ground loops”, I followed a star grounding method, connecting all grounds to a single point rather than multiple pats. This approach ensured clean and interference-free audio signal. The bridge, a key component for grounding (through a hole in the body), has been directly wired to the potentiometers shield. This prevented hum and static. In this stage, a multimeter was crucial for the continuity tests in order to verify that the grounding and the shielding were effective, providing pace of mind out of that “buzz”.
The refactored schematic is more than just a wiring diagram. It’s a blueprint for the soul of the instrument. It tries to simplify how the guts are interconnected. Creating this schematic forced me to think critically about every connection and anticipate potential pitfalls. For example, I ensured the wiring layout avoided unnecessary overlaps or loops that could introduce extra noise.
TAKEAWAY: By separating power paths for analog and digital systems and ensuring each component had a dedicated power solution, I was able to maintain clean, noise-free operation. This design also prevented components from overloading the system or causing voltage fluctuations. For example, the buck converters provided regulated outputs that not only matched the specific voltage requirements but also acted as filters, smoothing out any potential ripples from the battery output.
ELECTRONICS
One of the most funny steps was dismantle electronics and find them a new place in the world. The goal was to integrate multiple components (while keeping the busy space as small as possible) in a single, unified system. This process was about deconstructing commercial products (without breaking them), stripping them down to their essential parts and integrating them into the instrument. I wasn’t just a “plug-and-play” process, it required some reverse-engineering, testing and fine-tuning to work smoothly.
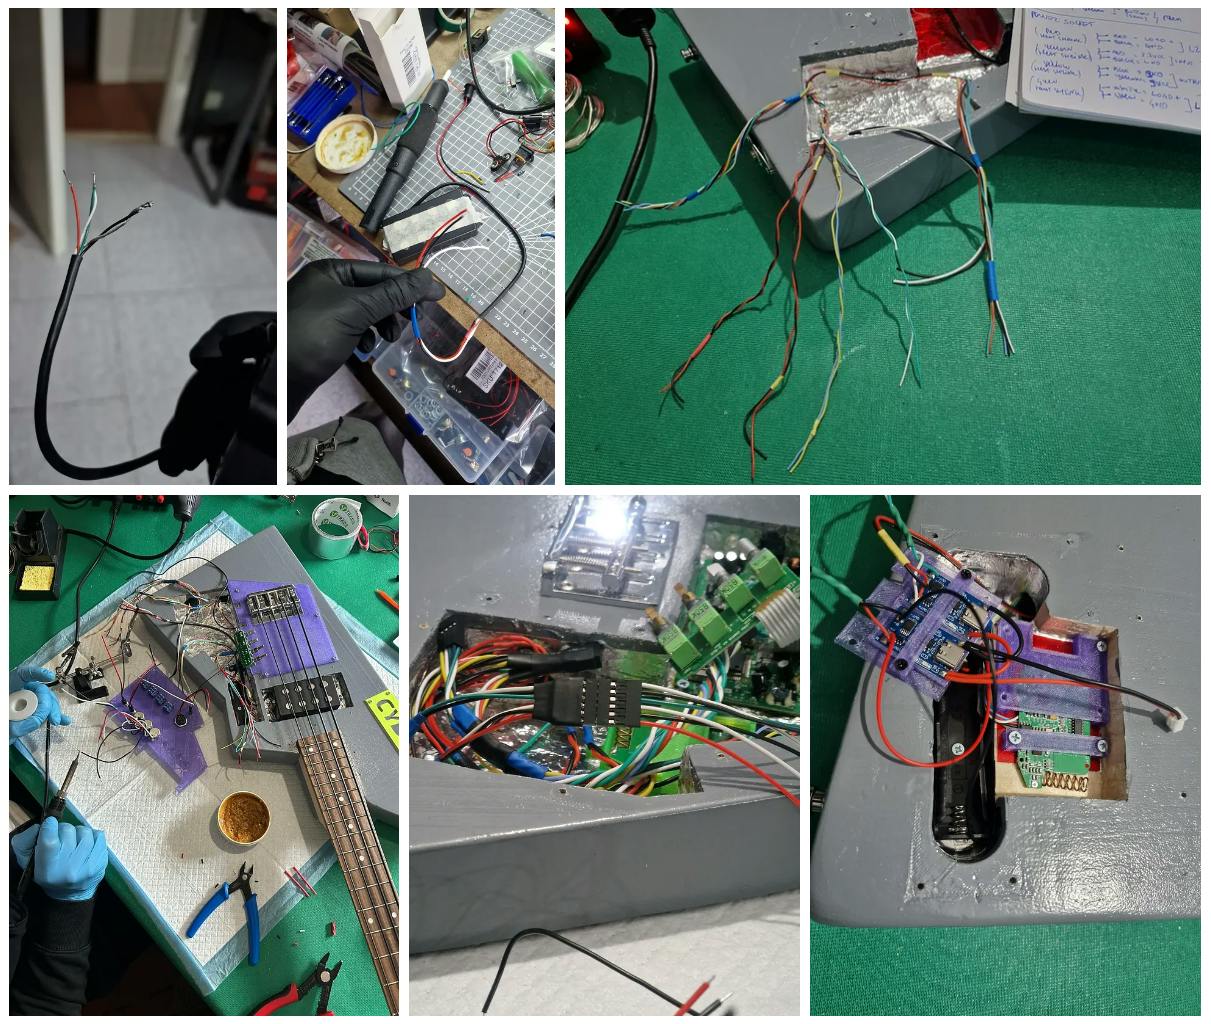
One of the boldest additions to the CYBERBASS was the integrated synth pedal effect which provides onboard sound processing without needing an external pedal-board. Although many musicians rely on floor pedals for tone shaping, it is inconvenient each time to lower/raise countless times to find “the sound.” Think a second about that, is a back-breaking process. That’s why I choose “the pedal” and embedded it directly into the instrument itself. This process required me to disassemble the metal housing, clutter the original PCB with unnecessary items by methodically removing non-essential sections, then, rewiring the core ones. First, powering it with a 9V battery on-the-fly, I could follow the main signal flow, locating the wires carrying the signal input, signal output, status led and effect engage/disengage button (once, foot-switch). Then I cut the battery off and I replaced it with my custom internal power system. By the end of this step, after a few tests I had a hardwired effect that became a permanent part of the instrument.
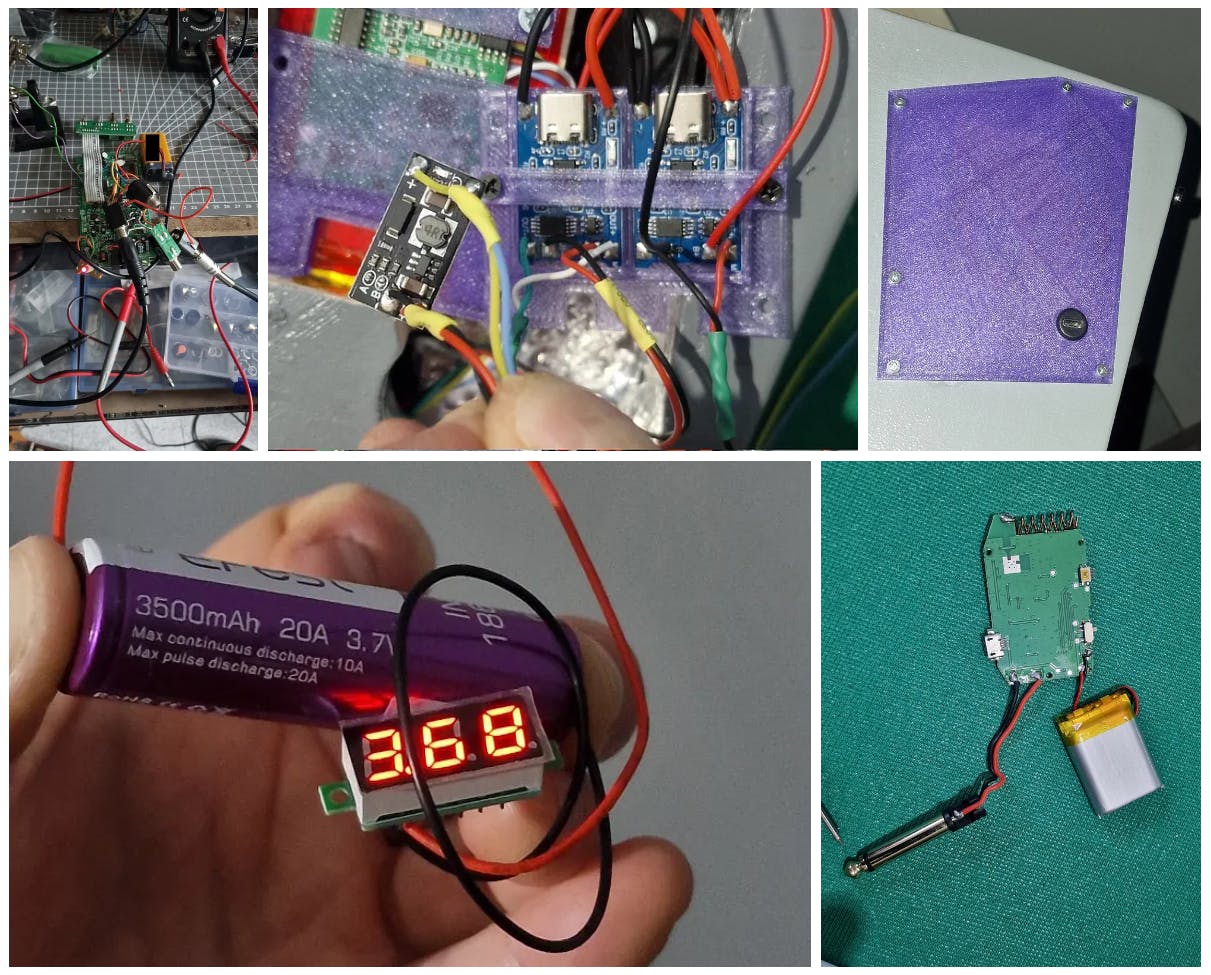
The power management system relies on two high-capacity (~3500mAh each) 18650 Lithium-Ion batteries, selected for their excellent energy density and robustness. One placed in the back and the other in the front of the bass, providing a steady 3.7V (~4.2V when fully charged) output as the foundation for the entire power architecture. To ensure charging feature, two TP4056 modules have been incorporated into the design (one for each battery) allowing the batteries to be charges independently, through a single USB-C socket (yeah, at the end of the story, I can charge the bass like a smartphone). From the main sources, power has been distributed to 3 subsystems using raw power and two buck-converters (also known as DC-DC or step-up/step-down). The first subsystem uses a step-down converter from 3.7V to 3V to power the onboard tuner, the second uses a step-up converter from 3.7V to 9V to power the integrated synth pedal while the third powers the wireless transmitter module. Last but not least, the voltmeters placed on the front plate (control panel) play a crucial role in monitoring the power system. Each voltmeter was wired to each battery, providing real-time feedback on their charge levels. This made it easy to assess when recharging was needed, avoiding unpleasant surprises during performances.
To enhance the freedom of movement of the instrument, I proceeded in integrating the wireless transmitter directly into, removing the embedded battery and hard-wiring the transmitter into the main power circuit, eliminating the need for separate charging. After replacing the input jack with direct signal wiring by bypassing the original one, I could integrate the transmitter seamlessly into the bass’s signal path. I followed the pinpoints available on the PCB of the TX module to identify the power input (VCC/GND), the sync button and the ON/OFF switch pins. This modification resulted in a compact, permanently installed wireless module, actionable by a switch, that eliminated the hassle of external transmitters, batteries, and unnecessary cables/adapters.
BONUS (HACK)
I wanted to dedicate an entire paragraph as a “bonus hack” to spend a few more words on the tuner implementation.
Foot-switch tuners are a SCAM.
I’ll show you why.
If you’ve ever shelled out ~$100 or more for a chromatic tuner pedal, you’ve basically paid for a glorified ~$3 circuit with a foot-switch and a fancy enclosure. The reality is that these commercial tuners are insanely overpriced, leveraging branding, marketing, and unnecessary features to trick musicians into thinking they’re essential. But guess what? They’re not.
In my case, I f*cked the system by stripping things down to their absolute essentials and soldering a bunch of wires**.** Wanna know the result? It worked just as well as any high-end pedal tuner.
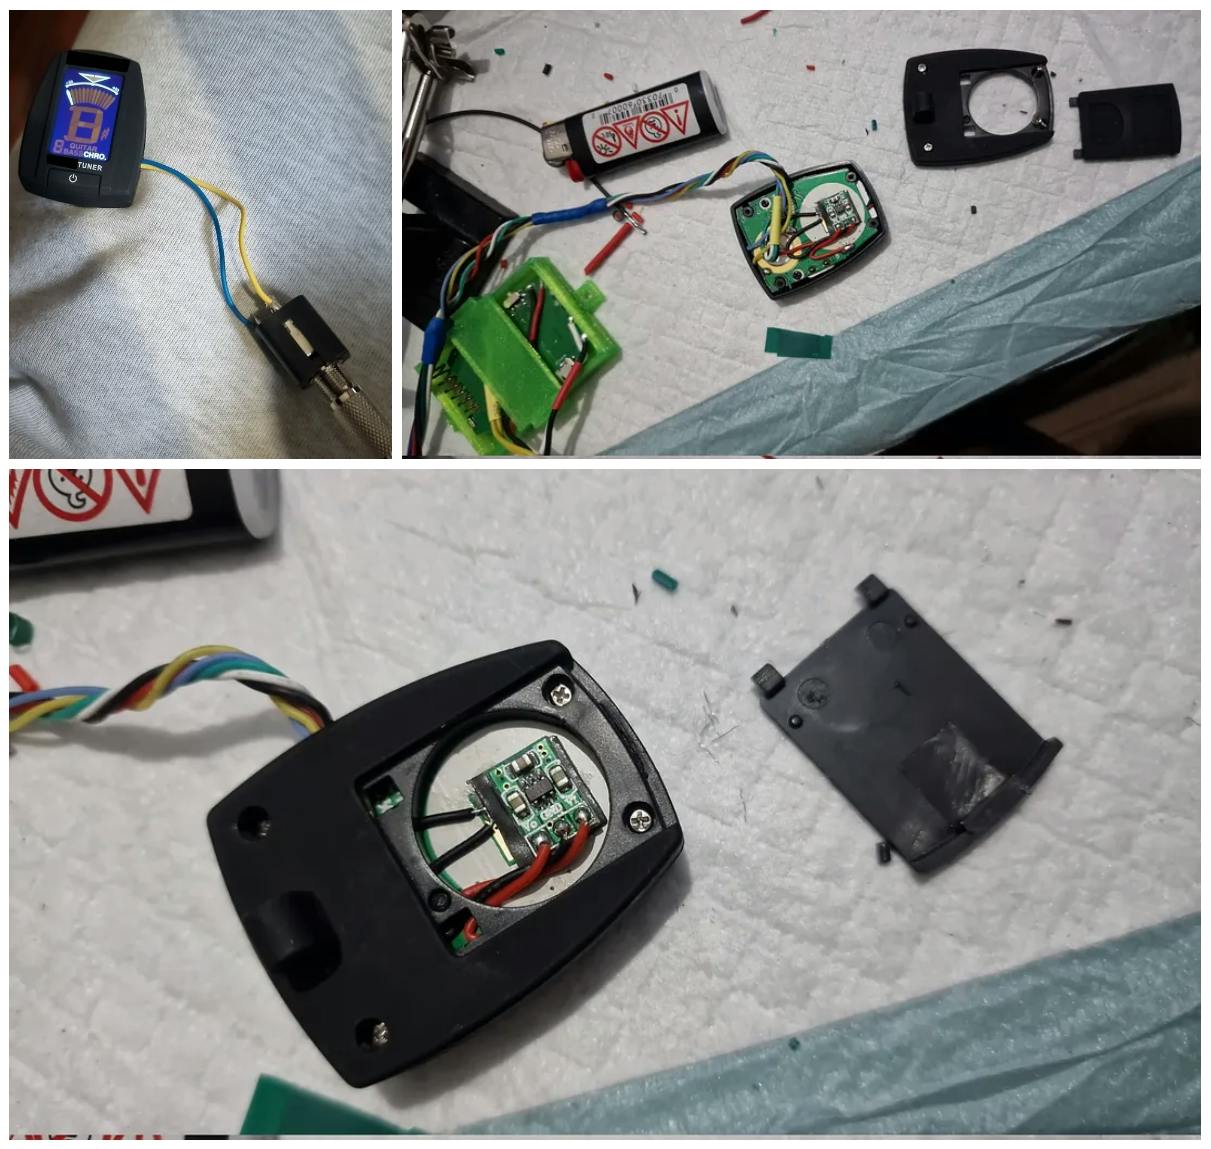
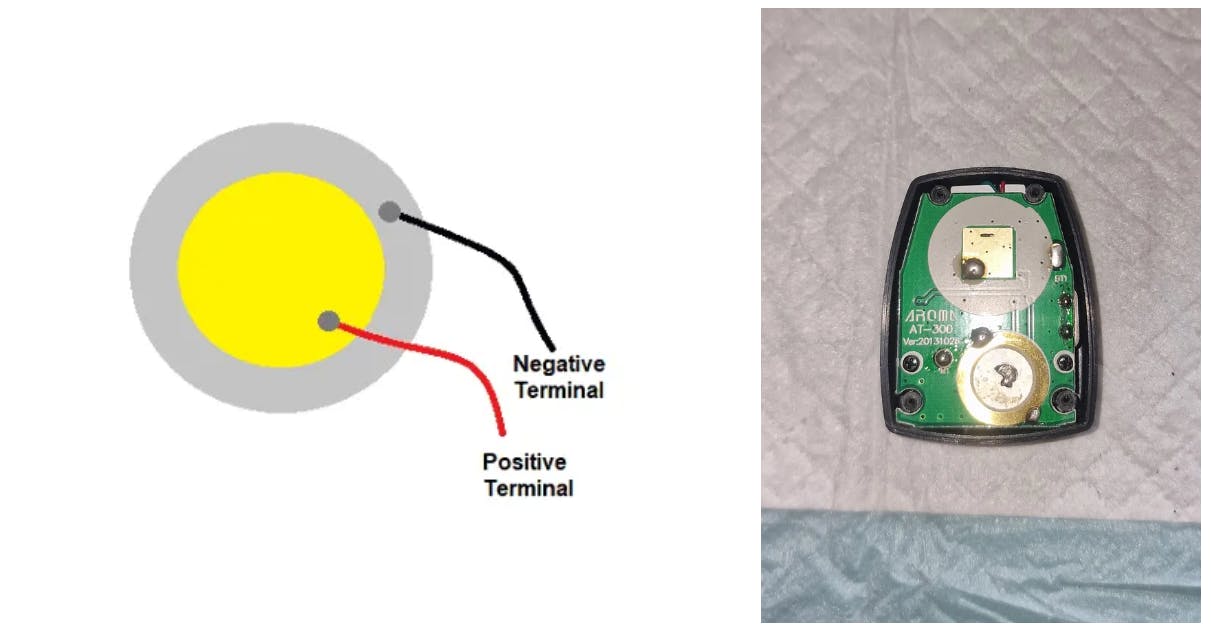
I cannibalized a dirt-cheap clip-on tuner (those small battery-powered tuners that attach to the headstock of a guitar). These tuners typically use a piezo sensor to detect vibrations from the instrument, meaning they don’t require a direct signal connection. However, since I was integrating this into my CYBERBASS, I needed direct signal detection in place, not a piezo in a hanging external hardware.
Inside every clip-on tuner, the piezo sensor is wired to the “+” signal input on the PCB, where it picks up vibrations. Instead of relying on an external piezo, I desoldered it and directly wired my instrument’s signal output to this input. This effectively turned the tuner into a true inline signal processor, just like a traditional pedal tuner. Now, instead of waiting for vibrations, it reads the actual electrical signal from the bass output.
These tuners typically run on a 3V coin-cell battery, which is both weak and impractical for a fully integrated setup. So, I scrapped the battery entirely and replaced it with a step-down buck converter (3.7V → 3V). This allowed me to power the tuner directly from the bass’s main power system, eliminating the need for separate replaceable batteries.
Lastly, I wired the power button of the tuner to a button switch embedded in the front plate. Now, the tuner can be easily and comfortably enabled/disabled manually.
TAKEAWAY: If you think yoiu really need a >$100 chromatic tuner, think again. Most widely expensive pedal tuners are just a rebranded version of the same $3 circuit wrapped in metal and given a footswitch to divert the signal. Instead of paying for overhyped nonsense, this hack proves that you can easily get the exact same funcitonality at almost nothing. So, next time you consider buying an overpriced pedal tuner, remember that you’re not paying for better tuning, you’re paying for marketing hype.
WIRING
Unlike fully passive electric basses, although the CYBERBASS offers a configuration for purely passive use, what remains to wire is active electronics. Improper wiring could lead to hum, ground loops, whistles, noises or even signal failure. Being methodical in this phase treating it like the delicate nerve system of a cybernetic organism, paid off.
TIP: For each component, I assigned colored wires (for example, red for power, black for ground, yellow for signal, etc.) and took note of mappings on paper. Then, I grouped wires by component, preventing tangles and confusion by using color-coded heat shrink tubing. This frustrationless approach made easy to trace back circuits in the chaos, before even touching the soldering iron.
TAKEAWAY: A cleaned, organized and manageable nest of wires makes troubleshooting and fixing effortless.
Another crucial aspect of wiring theCYBERBASS was ensuring proper grounding for all electronic components, particularly the bridge. Grounding the bridge establishes a direct electrical path to the ground, effectively eliminating static and reducing the risk of ground loops, a common source of hum or interference. I also connected all shielding materials, including the aluminum tape, to the circuit’s ground. This created a continuous “Faraday cage” that blocks external electromagnetic fields, ensuring a cleaner signal.
To avoid ground loops, I focused on the wiring layout, ensuring all ground connections converged at a single point rather than creating multiple paths. This “star grounding” technique is widely regarded as the most effective way to minimize interference and maintain consistent audio output. Finally, I used a multimeter to check every connection, confirming continuity and ruling out accidental short circuits, which could compromise the instrument’s performance.
TAKEAWAY: Proper grounding is essential for clean sound and noise-free performance. Ground the bridge to eliminate static, and connect shielding materials to the ground for added protection against electromagnetic interference. Use the star grounding method to prevent ground loops, and always double-check connections with a multimeter to avoid short circuits. These steps ensure reduced background noise and a professional, reliable sound in any playing environment.
Among the most significant challenges when integrating different components into a custom instrument there is ensuring easy accessibility for future modifications, repairs or upgrades. The front plate of the CYBERBASS has been designed to be fully detachable making disassembly/reassembly a breeze. To achieve that I used 2 kind of connectors. For all low-power signal connections I used the 2.54mm Dupont male/female connectors that can be easily unplugged without any hassle. For all the power supply connections, I opted for the JST a more robust connector to handle the higher loads. By using a modular connector approach the maintenance became significantly easier avoiding to desolder or tear everything apart every time.
TAKEAWAY: a fully hardwired system would have been a nightmare to maintain, whereas a detachable connector approach made any interop user-friendly.
ASSEMBLY
The last step. The first task was installing the main hardware: mounting the bridge and securing the pedal buried beneath its cover plate. Then, the remaining electronics into their respective compartments.
Bringing all these pieces together into a functional instrument, with every connector bond to its counterpart and every screw in its hole.
FINALIZATION
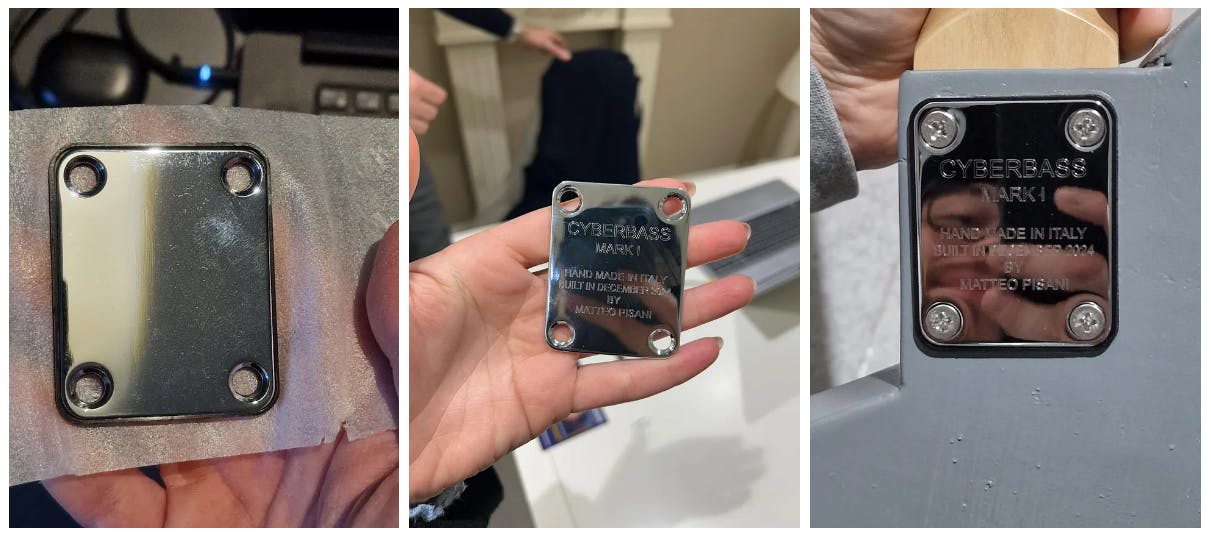
No custom instrument feels truly complete without a personal touch, something that makes it unmistakably yours. For the CYBERBASS I wanted to crystallize its realization by having its essence engraved in the neck plate, marking the instrument with its own unique signature. The engraving process was almost ceremonial.
This wasn’t just for aesthetics, it was a declaration that this bass was one of a kind, built with passion with an eye to innovation and a rentless drive to push boundaries. Once installed, the plate served as a reminder of the journey, the challenges and the frustration faces, the evolution of the initial ambitious idea to a tangible, playable and enjoyable reality.
INTONATION
With everything assembled, it was time to fine-tune the CYBERBASS for optimal playability. Intonation isn’t just about tightening strings and calling it a day — it’s a meticulous process of balancing string length, bridge adjustment, and truss rod alignment to ensure that every note rings true across the entire fret-board. Achieving a satisfying intonation in a stringed instrument is not all about physics, most importantly is about feelings. Several factors influence the tuning but there are three critical elements: the string action, the bridge saddle positioning and the truss rod adjustment.
“Action” is defined as the height of the strings on the fingerboard which is determined by a set of adjustments (truss rod, bridge height, capo), which determine how comfortable the instrument will be to play.
The goal is to fine-tune the string length so that the 12th-fret note matches the 12th-fret harmonic. If the fretted note is sharp, the saddle must be moved back, increasing the string length. If it’s flat, the saddle moves forward. I started with the bridge, making micro-adjustments to each saddle until the harmonics at the 12th fret matched their fretted counterparts. A perfectly intonated instrument ensures that no matter where you play on the neck, every note remains in tune — a crucial detail for an instrument built to produce high-precision sounds.
Next came the truss rod, a delicate but essential adjustment that determines the curvature of the neck. Too much relief, and the action would be too high, making the bass harder to play. Too little, and the strings would buzz against the frets. After careful tweaking, the neck settled into its perfect form, providing smooth playability without compromising sustain or attack.
Harmonics were checked, tuners were tested, and every note was scrutinized. The CYBERBASS was now not just functional — it was perfectly dialed in, ready to unleash its full potential.
TAKEAWAY: Perfect intonation is key to a professional-sounding instrument. Proper string action ensures playability without fret buzz or sharp notes, while precise bridge saddle adjustments fine-tune intonation across the fretboard. A well-set truss rod balances neck relief, preventing unnecessary tension. The 12th-fret harmonic test is the ultimate checkpoint — if the fretted note is off, tweak the saddle accordingly. Even in a DIY build, precision here matters.
TESTING
The moment of truth. There’s a distinct kind of anticipation when powering up a custom-built instrument for the first time. Every wire, every circuit, every component had been meticulously placed. But will it all work together?
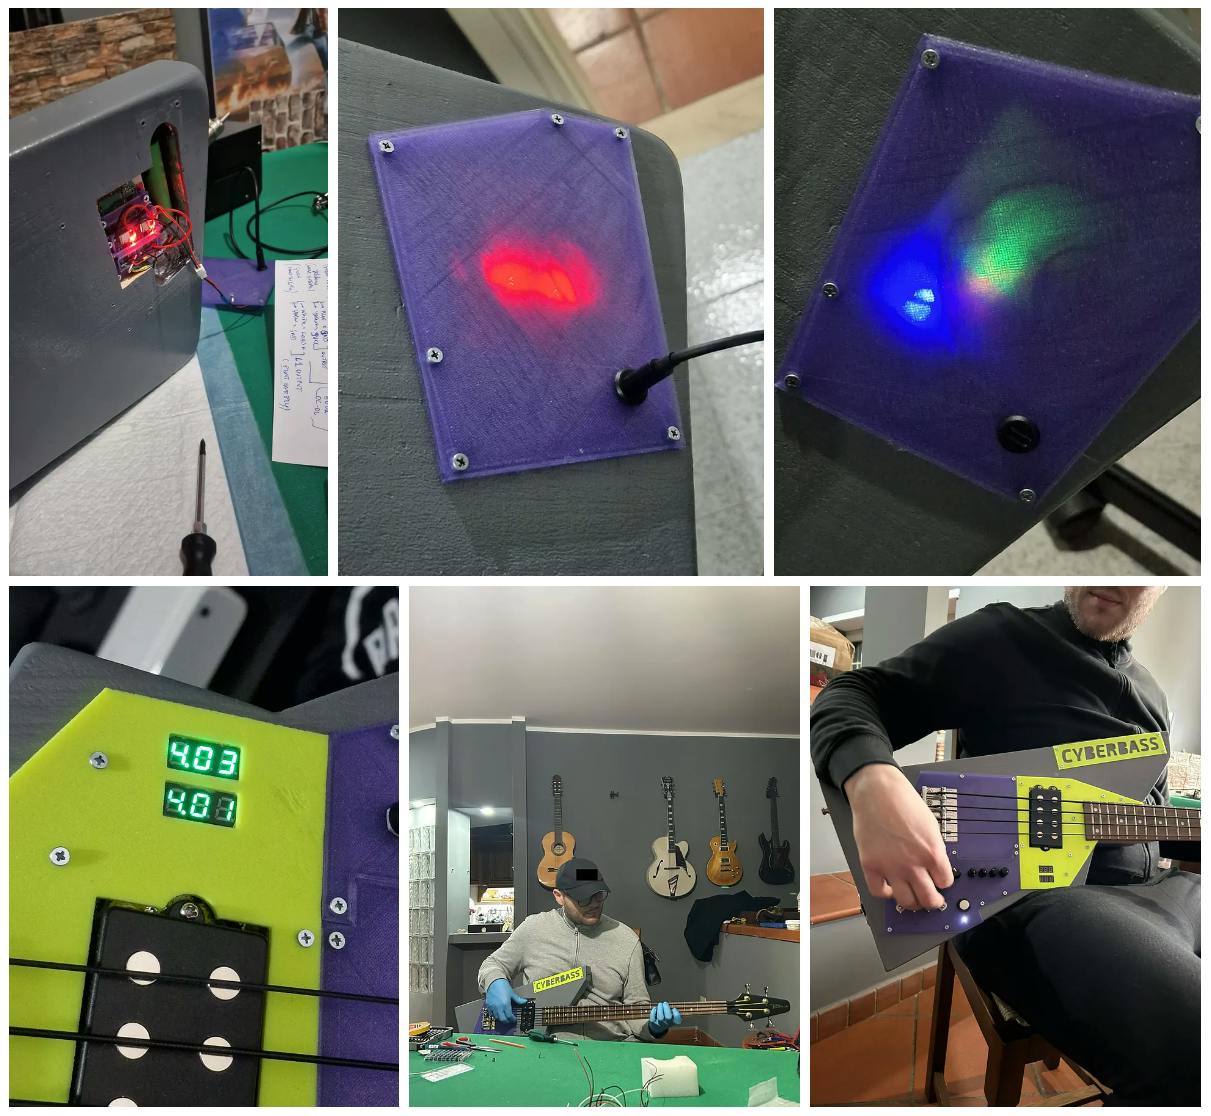
Flipping the first switch, the white led lit up, confirming that the power distribution system was fully operational.
Flipping the second switch the wireless transmitter turned on an automatically bond with the amp.
Flipping the third switch and the voltmeters lit up. Both battery voltages were around ~4V (nearly fully charged).
Flipping the 4th switch, i deviated the signal from the passive path to the active one.
Pushing the big white button I disengaged the synth effect so the led turned off.
I rolled up the volume knob and struck the first note. The sound was powerful, clean, without a hint of unwanted noise (that the grounding and shielding techniques had done their job).
Pushing the big white button for the second time I engaged the synth effect so the led turned on again.
Juggling with its knobs projected the sound into a futuristic sonic landscape. The wireless transmitter delivered a crystal-clear signal, allowing me to move freely without a cable tethering me down. And the hacked tuner? It worked like a charm, proving once and for all that overpriced footswitch tuners were unnecessary.
Every function was tested rigorously. Volume pots, tone control, effects, tuning stability. I secretly had an experienced jazz double bass player I trust try it out; he was flabbergasted by the sound, intonation and overall quality and robustness. The CYBERBASS passed every test with flying colors, marking the culmination of a month of work.
CONCLUSIONS
What a journey. Looking back at the entire process, this project was far more than just assembling an instrument, it was a deep dive into luthiery, engineering, electronics, hacking and problem-solving. There were mistakes along the way, but each misstep was a learning experience, refining both the instrument and my approach to DIY engineering.
Above all, to me the CYBERBASS represents what’s possible when creativity meets technical. It’s proof that you don’t need to spend a fortune to build something extraordinary. You just need the vision, the right tools, a problem-solving mindset, and a willingness to experiment.
“The key is perfectly loving the imperfection.”
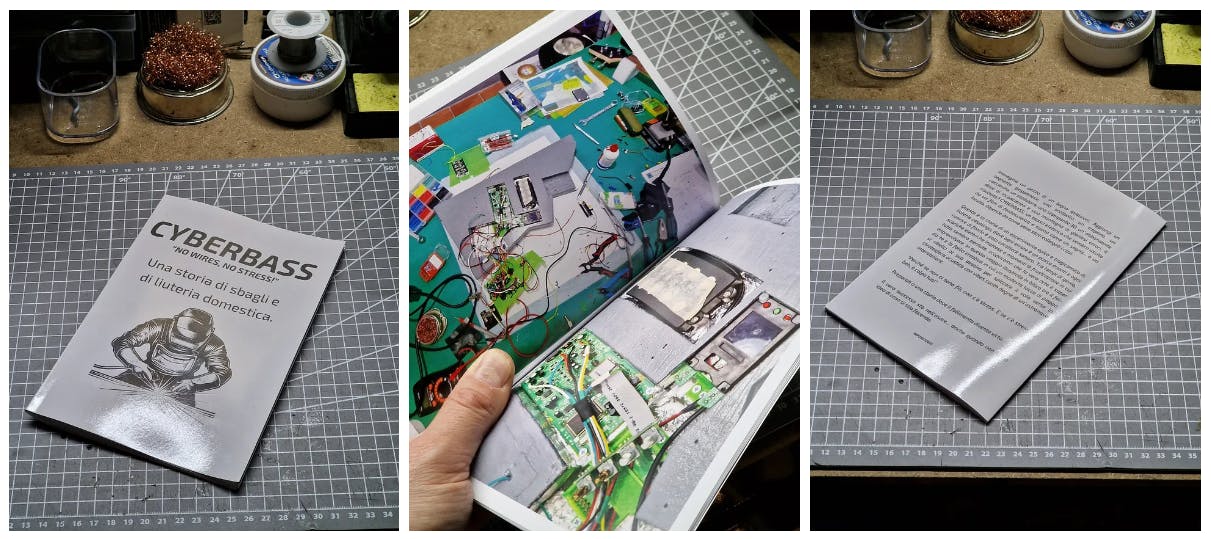
Throughout this build, I documented every step — the successes, the failures, the unexpected twists — capturing the entire journey in photos and notes. I printed a small booklet as a tangible record of the project that holds more than just images; it preserves the process, the evolution, and the learning behind every decision. But as I flipped through its pages, a thought crossed my mind: what if this was just the beginning?
The idea of turning this adventure into a full-fledged book isn’t far-fetched. Beyond the technical aspects, this project embodies the essence of DIY craftsmanship — pushing limits, problem-solving, and turning raw materials into something unconventionally appreciable. A book could expand on everything: the design choices, the electronic challenges, the sound experiments, and the inevitable mistakes that turned into lessons. Maybe one day, this journey will be more than just a single bass — it could be an open invitation for others to create, modify, and hack their own instruments, proving that you don’t need a factory to build something great.
GREETINGS
No project of this scale is ever a solo effort, and there are a few key people who made this possible. My deepest thanks go to my best friend,
And, of course, a special thanks to my assistant, G., whose unwavering presence (and occasional curiosity-driven interruptions) added an extra layer of personality to the build process.
The CYBERBASS is finished — but the journey of discovery, hacking, and pushing boundaries is far from over.
NEXT
Part II is i the oven, stay tuned.

