In the last blog, we got an overview of Wi-Fi security protocols. To summarize:


With the Wi-Fi security fundamentals covered, we are ready to get our hands dirty…
Disclaimer: Everything shown in this blog was performed within legal boundaries and with full authorization from the network owner. This content is strictly for educational purposes. The author does not condone or take responsibility for any misuse of the techniques demonstrated.
Carrying a laptop with a wireless adapter to capture a WPA handshake isn’t ideal, especially in crowded places where you might get noticed.
That’s exactly where the Raspberry Pi Zero comes in: a lightweight, headless setup you can tuck into your backpack and access remotely from your phone, all while staying stealthy.
The first part of the series focuses on setting up and configuring the Pi as well as accessing it remotely from your mobile device.
But before we start, let me briefly introduce…
The Raspberry Pi
The name Raspberry comes from the tech trend of naming companies after fruits, while Pi stands for Python, as Raspberry Pi was originally designed to run Python scripts.


In the simplest terms, it’s a mobile computer no larger than a credit card.
Originally developed to promote interest in computer science among school children, the Raspberry Pi quickly gained popularity due to its low cost, compact size, and flexibility.
Today, it’s used in a wide range of fields, including robotics, IoT (Internet of Things), industrial automation, and cybersecurity.
At its core, the Raspberry Pi uses the Broadcom BCM2835 System-on-Chip (SoC), which includes an ARM11-based processor. The ARM-based architecture allows it to operate efficiently on a low-power 5V 1A supply via a micro-USB port.
However, this also means it’s not compatible with traditional x86 software designed for desktops or laptops.
Instead, the Raspberry Pi runs operating systems designed for the ARM architecture, most commonly Linux distributions, including Raspbian (now Raspberry Pi OS). But..
Why Raspberry Pi Zero?
I wanted a budget-friendly and portable solution for wardriving and capturing WPA handshakes using just my phone. While options like Kali NetHunter exist, they have some drawbacks:
- Your phone must be compatible with NetHunter
- It usually requires rooting your device
That’s where the Raspberry Pi Zero shines. It’s a low-cost, compact single-board computer that runs Linux and offers just enough power for simple tasks or minimalist computing.
Although it has only a 1GHz single-core CPU and 512MB of RAM, that’s enough for lightweight activities like scanning networks or capturing WPA handshakes.
It’s not strong enough to crack hashes or handle heavy multitasking, but it’s perfect for acquiring handshakes.
Now, let’s get hands-on with the Raspberry Pi Zero.
Setup
We will be using the Raspberry Pi Zero W, which comes with a built-in Wi-Fi and Bluetooth module, ideal for our use case.
Additionally, you need:
- Micro SD Card (at least 8 GB)
- Card reader (to flash the OS to the micro SD)
- Wireless Adapter with Monitoring Mode
- OTG Cable (to attach the wireless adapter)
- Power Bank (to supply power when carrying around)
We’ll be using a headless setup, meaning there won’t be an interactive desktop UI to control the Pi. Instead, you’ll interact with it remotely through an SSH terminal.
Prerequisite: You should have a basic understanding of Linux commands to follow along.
Flashing The OS
The first step is to flash the desired OS onto the micro SD card. You can do this in two ways:
Using **Etcher **or the official Raspberry Pi Imager
For this demonstration, I’ll use Raspberry Pi Imager since it’s the official and recommended tool, making the process straightforward.
If your SD card has existing partitions or formatting, it’s best to erase it. Raspberry Pi Imager can do this automatically, choose Erase from the “Choose OS” list. Alternatively, if you’re on Windows, you can use Windows Disk Management to delete all volumes on the card before flashing.


- Select your Raspberry Pi model
Since we are using Raspberry Pi Zero W, we will select the Raspberry Pi Zero option, not the Raspberry Pi Zero 2 W


2. Choose the desired OS
You can select an OS directly from the Imager or download any Raspberry Pi-compatible OS from the web and load it as a custom image. For this demo, I’ll select the Raspberry Pi OS 32-bit Lite (lightweight version) since we’re using a headless setup without a desktop environment.

3. Select your storage device
This should be your card reader connected to the computer.
Configuring Wi-Fi and SSH
Before proceeding, since we’re using a headless setup, we need to pre-configure Wi-Fi and enable SSH before the first boot. This allows you to connect to the Pi right away once powered up.
If you’re using Raspberry Pi Imager, you can easily do this in the advanced settings. If you’re using Etcher, you’ll need to configure these manually.
Using Raspberry Pi Imager:
After selecting the Pi model, OS and storage device, click Next. A pop-up will appear asking for OS Customization.
Click Edit Settings to configure:
- Hostname (optional): Set the Pi’s hostname.
- Username and password (optional): Set your default user credentials.
- Wi-Fi SSID and password: Enter your wireless network details. (pre-filled in some devices)
- SSH: Go to the Services tab and check Enable SSH. You can enable SSH with password or public key authentication.
Once done, click Yes in the confirmation dialogue to save your settings and flash the image.

Using Etcher:
After flashing the OS, you need to create the following files in the boot partition of the micro SD card:
wpa_supplicant.conf: For legacy systems usingwpa_supplicant.conf..nmconnection: Network profile located in (/etc/networkmanager/system-connections/) for newer OS versions using NetworkManager.SSH: A blank file named SSH (no extension) to enable SSH on boot.userconf.txt: Contains a single line defining user credentials in the format:
Now that we have flashed and configured the Micro SD Card, it’s time to..
Remotely Access Raspberry Pi
Before we power it up, let’s take a quick look at the Raspberry Pi Zero W board itself.


The main components on the board include:
- 1GHz single-core CPU
- Mini HDMI port
- Micro USB OTG port
- Micro USB power port
- 40-pin GPIO header
- CSI camera connector (v1.3 boards only)
- Built-in Wi-Fi and Bluetooth antenna
To check if your Raspberry Pi Zero W board is working, plug a USB cable into the OTG port and connect it to your laptop or desktop. Open Device Manager and look under the Other devices section. If you see a new device listed there, it means your Pi is powering on correctly.


For the steps below, I’ll be using two Android apps: **Fing **to find the Pi’s IP address and **Termius **to establish an SSH connection.
- Powering up Pi
-
Insert the micro SD card into the card slot.
-
Connect a USB cable to the USB Power port on the Pi, then plug it into a power source such as a power bank.
You should see the onboard LED blinking; this indicates the Pi is powered on. (The blinking patterns can signal errors, but troubleshooting those is outside the scope of this blog. You can refer to the official page.)
Using Fing or a similar app, scan the network to find all connected devices and retrieve the PI’s IP. If you don’t see the Pi’s IP right away, wait a few minutes; the first boot can take some time. If it still doesn’t appear, there may be a problem with your SD card configuration or boot process. In that case, try re-flashing the SD card.


Raspberry Pi Zero W only supports Wi-Fi on the 2.4 GHz band, not 5 GHz.
2. Connecting SSH
- Open Termius (or another SSH client) on your phone.
- Go to the Connections tab.
- Enter the SSH connection details in this format:
ssh @ -p
-
Tap Connect.
-
If asked, accept the host key to continue.
-
When prompted, enter the password you set earlier.


Before we move forward, let’s run some basic commands:
- Update and Upgrade Packages
sudo apt update && sudo apt upgrade -y


2. Check the hardware info
pinout
The pinout command prints a diagram of the Raspberry Pi’s board along with hardware specifications, which is useful for quick reference.


At this point, we have successfully established an SSH connection to the Raspberry Pi from our Android device. For this initial connection, I used my home LAN network, which is not ideal for our use case.
When travelling with the Pi, you won’t have access to your home network, the Pi and your phone must be on the same local network to communicate over SSH.
To solve this, we’ll use the mobile hotspot on our phone, so that both the Pi and the phone connect to the same network wherever you go, as long as you have a stable cellular connection.
Since the hotspot is a new network, we first need to configure the network manager and create a new network profile with a higher priority so that when the hotspot is available, the Pi connects to it automatically.
For the following steps, I’m using my laptop, while my phone has hotspot enabled, waiting for connections.
We’ll use nmcli, the command-line tool for NetworkManager, to create and manage network connections. Make sure you’re using root privileges, as you’ll need them to scan and edit Wi-Fi profiles.
- Scan nearby networks:
sudo nmcli dev wifi list
If your desired network (the phone’s hotspot) doesn’t appear, try rescanning:
sudo nmcli dev wifi rescan


2. Connect to the hotspot:
sudo nmcli dev wifi connect --ask
--ask flag will prompt you for the hotspot password interactively, no need to hardcode it into the command.


Once the Pi connects to the hotspot, you’ll lose your current SSH connection (since the network interface changes).
We have successfully created the network profile, but we are not done yet..
Now let’s reconnect to the Pi using your mobile phone.
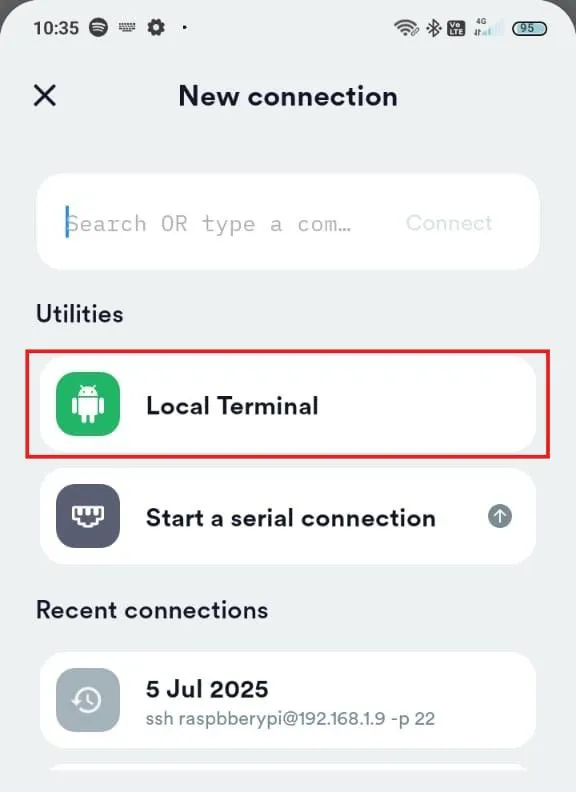
Since most mobile hotspots isolate devices and don’t support tools like Fing, we’ll use Termius’ local terminal to identify the Pi’s IP address.
- Open Termius
- Go to the Connections tab → tap the search bar

- Under Utilities, open Local Terminal

- Copy the Pi’s IP (assuming the only device connected to your hotspot is the Pi):
ip neigh


IP neigh (short for neighbor) is similar to the older ARP command; it shows devices recently seen on the network by their IP and MAC addresses. Unlike ARP, it’s part of the more modern iproute2 package.


We need to modify the auto-connect priority so that our hotspot has a higher priority.
- Confirm the connection profile
sudo nmcli connection


- Check the connection details of the hotspot
sudo nmcli connection show


You can see that by default, the auto-connect is enabled, and the priority is 0
- Modify the priority and confirm changes
sudo nmcli con mod  connection.autoconnect-priority 10
sudo nmcli connection show


Now let’s test the connection, exit the SSH connection, re-plug your Pi and wait for it to connect to the hotspot. You should be able to successfully establish an SSH connection over your mobile hotspot.


If not, make sure the hotspot is not over 2.4 GHz and repeat the above steps.
In the next part, we will capture WPA handshakes using our new Raspberry Pi Zero W setup over a mobile hotspot..